I’ve written before about remaking every room in my home since we bought it 10 years ago.
The old kitchen was in the back of the house with a large bay window overlooking the backyard. The room was small. 13ft by 13ft. Adjacent to it was a diningroom, also 13′ X 13′. I removed the wall between the two rooms and planned my new, eat-in kitchen.

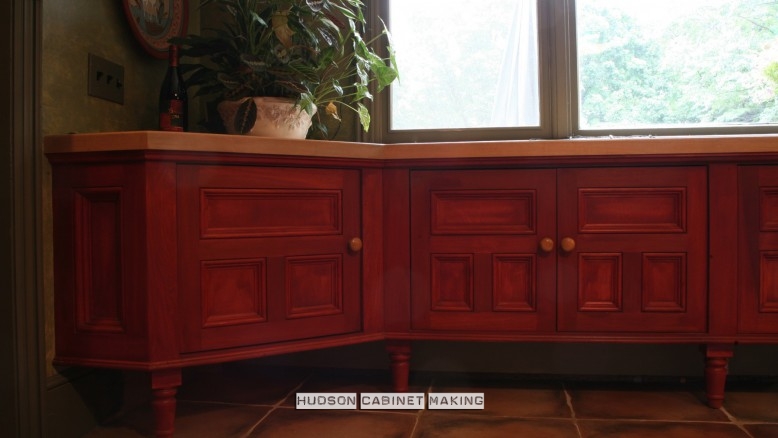
- shorter cabs to sit under window w/ legs to vent baseboard heat

Over the years, I had learned a number of things about how to make cabinets and furniture more substantial, richer looking, with bolder detail. I wanted to get away from the look of commercial cabinetry with it’s repetition of similar cabs, all having a single drawer along the top and a pair of doors beneath, usually over-lay doors (over laps the opening) and plain, flat sidewalls.
Instead of over-lay, we placed each door and drawer front inside the opening (‘inset’ is the way we build almost all our furniture) …but instead of flush, I set each of them back a 1/4″ from the surrounding face frame. This setback created more depth on the faces / made the cabinets even more articulated.

- thick, strong detail on the face, edges and sidewalls

I decided to make all the exposed faces (doors, drawer fronts, face frames and sidewalls) an inch and a quarter thick. ( others are 3/4″ thick ). This created extra deep recesses for each panel.

- you won’t easily find this depth in a panel unless you visit a cathedral

I used a rather large beading router bit (1″ diameter) to decorate each outside vertical corner. I passed the router two times. Once along each of the two adjacent sides to accomplish a large, 3/4 of a circle bead that would be seen from the front AND the side.

- This counter opening (to a garbage bag below) is for food scraps. It makes food prep easier/ finger pull recesses to remove ‘trap door’

The counter tops we fabricated as well. I joined 2″ thick by 8″ wide planks of rock maple (better looking than butcher block) and finished them clear. We used wooden knobs and finished them clear as well.

- even the island’s back is handsomely paneled

You may notice some pictures have a barn red ‘wash’ (stain) we did originally. Three years later we painted them a a solid deep red color. I like them better this way. Ms. Hudson is not so sure.

- uneven width, paired doors gives it a hand-made look


- small carvings and pottery adorn the shelf running 16″ off the ceiling

I made a double-tier drawer for the silverware. The top section slides back and forth to expose each half of the lower level.

- notice the small knob (in the inside of the drawer, facing up) to slide the upper tier from side to side

Where the two room’s ceilings (former diningroom and kitchen) met, I placed a ‘transition’ beam in between as the ceilings were not in line with each other. I added more detail by installing a pair of hand made corbels where the beam met the walls on each end.

- yet another detail to make the woodwork older and richer looking

I incorporated one more detail that I hesitated to include here because it’s SO strange but, ‘what the hell’
A number of years ago, a family member bought us a carved wooden mask. It was painted black and gold. Didn’t fit our decor but my wife insisted we place it somewhere so I sanded it down and carved the back to fit into one of our side wall panels.

- our home is filled with indigenous art so this carved face fits right in

We wanted the cabinets painted a dark, earthy red and stainless steel for the appliances. We glazed the walls in two tones of green and found some large (16″X16″) rustic tiles for the new floor. To match the floor, we used an earth colored, tumbled marble with a decorative inlay for the backsplash.
We found some antique, green glass poolroom light fixtures to place over the island. They were hung from both sides of a center positioned ceiling fan. We like these better than AC to keep each room cool during the summer.

- It is difficult to find an angle that allows you to appreciate the entire kitchen. You should stop by and I’ll show you the place!

I don’t know of a kitchen outlet that doesn’t use the word ‘custom’ in their claims. I use this kitchen to show potential clients what’s possible when it’s TRULY custom built.
Within a few weeks, I’ll post a blog about the eat-in section of the kitchen. I just wanted to post a blog, not write a novel…
Russell Hudson / Hudson Cabinetmaking, Inc. / January 2011
You must be logged in to post a comment.